linux centos上如何安装git并下载源码安装?
《linux centos上如何安装git并下载源码安装?》要点:
本文介绍了linux centos上如何安装git并下载源码安装?,希望对您有用。如果有疑问,可以联系我们。
相关主题:服务器配置
现在git上有很丰富的开源软件,怎样简单地下载到你的linux centos上并安装执行?
下面按步骤来操作:
一、先创建创建github帐号 。如xxx@qq.com,然后:
(1)安装git
yum install git -y
(2)生成ssh key:
执行ssh-keygen -t rsa -C "xxx@qq.com",如下
$ ssh-keygen -t rsa -C "xxx@qq.com"
Generating public/private rsa key pair.
Enter file in which to save the key (/root/.ssh/id_rsa):
Enter passphrase (empty for no passphrase):
Enter same passphrase again:
Your identification has been saved in /root/.ssh/id_rsa.
Your public key has been saved in /root/.ssh/id_rsa.pub.
The key fingerprint is:
2e:db:7c:b9:e6:a4:a7:0f:04:bd:ad:4f xxx@qq.com
The key's randomart image is:
+--[ RSA 2048]----+
| |
| . |
| . . |
| . o |
| S o . |
| o . . |
| . + o.o E |
| = O+ .+ |
| ..B==+..o |
+-----------------+
上面说明了公钥在 /root/.ssh/id_rsa.pub
(3)到github网页,在右上角选择setting—>SSH and GPG keys—>New SSH keys—>Title 取一个标识题,
Key一栏则把/root/.ssh/id_rsa.pub里面的内容完全复制进去
(建议用gedit打开,ctrl A全选–>ctrl c复制–>ctrl v 粘帖到key里面) ,注意不要复制空格。
最后会得到:
aliyun (这是你的标题)
Fingerprint: 2e:db:7c:b9:.....bd:ad:4f
(4)测试是否成功
# ssh -T git@github.com
如果出现
Are you sure you want to continue connecting (yes/no)? yes (这里输入yes)
Warning: Permanently added 'github.com,13.229.188.59' (RSA) to the list of known hosts.
Hi xxxxxx! You've successfully authenticated, but GitHub does not provide shell access.
那么表示已经成功连上github
(5)配置git的配置文件username和email
#配置用户名
$ git config --global user.name "我的用户名"
#配置email
$ git config --global user.email "我的github所使用的注册邮箱"
下载git包:
比如下载这个: https://github.com/Valloric/YouCompleteMe,可以通过这个网址来下载YouCompleteMe:
$ git clone https://github.com/Valloric/YouCompleteMe
也可以在用单引号将网址括住,效果是一样的:
$ git clone 'https://github.com/Valloric/YouCompleteMe'
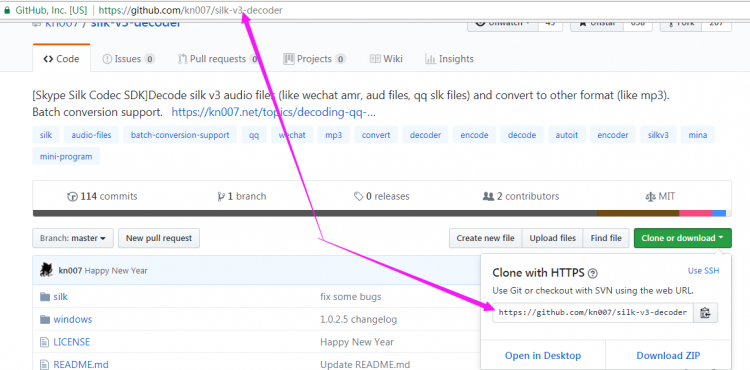
注意网址用git上项目的URL或如图方式得到的地址均可:

也可以将https改为git,例如:
git clone git://github.com/Valloric/YouCompleteMe
git clone 'git://github.com/Valloric/YouCompleteMe'
下载过程如图:

下载后,就可以执行包安装,比如:
$ composer install
或npm等包安装。
还可以建立分支:
clone下来的代码还需我们建立分支,可以使用git checkout -b master 来建立一个主线分支,完全和github上面的相同;
建立完成后,在使用git checkout -b master_sky ( 名称自己定义) 来建立自己的分支,这样就可以任意去修改源码了。如下图所示
相关教程
- PHP对SEO友好的内涵漫画PHP源码
- PHP文件分享和云存储源码破解版 BeDrive v1.9 类百度网盘网站源码
- 乐卡同城一卡通通用积分PHP系统源码
- PHP实战:CI框架装载器Loader.php源码分析
- 查看LINUX服务器性能负载的常用工具和nginx问题的排查方法
- LINUX PHP7如何把curl扩展的SSL版本从NSS改为OpenSSL以支持openssl
- PHP学习:Linux下PHP加速器APC的安装与配置笔记
- PHP应用:Linux下安装PHP MSSQL扩展教程
- CentOS7与6的区别
- PHP实例:Linux下安装oracle客户端并配置php5.3
- PHP应用:在win7中搭建Linux+PHP 开发环境
- 在linux centos上安装node.js
同类教程排行
- Zabbix模板大全:700多份模板和脚
- 运维开发实践:基于Sentry搭建错误日
- 在window中安装cygwin和swo
- 当心陌陌泄漏你的位置信息:通过3次位置移
- 阿里云ECS(经典网络)如何实现内网互联
- 编译faac时出现错误:make[3]:
- VCS集群资源(Resource)状态U
- Windows上ARP缓存更新延迟导致修
- 硬件运维:使用IPMITOOL解决服务器
- PHP7编译配置时常见的错误
- VCS(Veritas Cluster
- 试用Grafana:一个自动化运维常用的
- Google监控系统BorgMon相似实
- centos7如何去掉firewalld
- 利用Dnsmasq部署DNS服务
